Paint Flaking But No Damp? Here’s the Real Problem.
Paint Flaking But No Damp? Here’s no 1 Real Problem
Roger tackles a viewer’s query regarding persistent Paint Flaking, initially mistaken for a damp issue.
Explore the use of a specialised primer to address Paint Flaking, ensuring a lasting finish for your DIY home improvement projects.
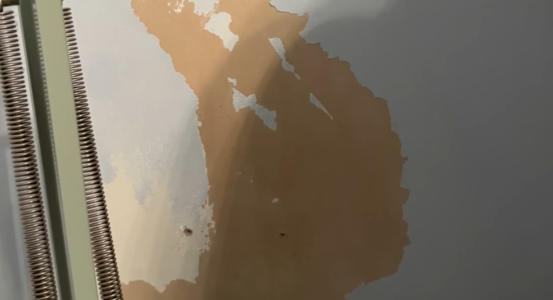
Paint Flaking is one of those problems that can instantly make homeowners suspect damp.
You see flakes lifting away from the surface, patches of paint separating from the wall and areas that look rough, cracked or damaged, and the obvious conclusion can be that moisture must be getting in somewhere.
But what if there isn’t actually a damp problem?
That’s the question Roger tackles when looking at a viewer’s query about persistent paint peeling. While damp can certainly cause paint to blister, bubble, flake and fail, it isn’t the only explanation.
Sometimes, the problem is much closer to the surface.
And in some cases, repeatedly painting over the damaged area can actually make the problem worse.
The key is understanding why the paint is failing before trying to repair it.
Paint Flaking Doesn’t Automatically Mean Damp
Paint Flaking and damp often get linked together because moisture is one of the most common causes of problems with painted surfaces.
Water can enter masonry, migrate through walls or become trapped beneath coatings. As moisture moves through a wall, it can affect the bond between the substrate and the paint.
Eventually, the paint can blister, bubble, peel or flake away.
But there are other reasons for Paint Flaking.
The surface may not have been prepared properly in the first place.
Old paint may have become poorly bonded.
The wall may have been dusty or chalky.
A previous coating may be incompatible with the new paint.
The surface might have been too smooth.
The wrong primer may have been used.
Or the wall may simply have layers of old paint that have deteriorated over time.
This is why the first step shouldn’t always be reaching for a damp-proofing product.
It should be finding out what is actually happening.
Look at the Pattern of Paint Failure
The pattern of the peeling can provide useful clues.
Damp-related paint failure can sometimes be concentrated around particular areas.
You might see staining, tide marks, mould growth, salts or persistent moisture.
There could be a connection with an external defect such as damaged pointing, defective gutters, leaking pipes or cracks in the masonry.
But Paint Flaking caused by adhesion problems can look different.
You might find that the coating is simply lifting away in sheets or flakes, particularly where several layers of old paint have accumulated.
There may be no obvious staining.
There may be no musty smell.
The wall may feel completely dry.
That doesn’t prove there is no moisture problem, but it does mean you shouldn’t automatically assume damp is responsible.
Old Paint Can Be the Weakest Link
One of the most overlooked causes of Paint Flaking is simply the condition of the existing coating.
A wall can contain several generations of paint.
One homeowner paints it.
Another homeowner paints over that.
Years later, somebody decides to redecorate again.
Eventually, there can be multiple layers of coating sitting on the same surface.
If one of those older layers has a poor bond with the substrate, adding another coat doesn’t necessarily solve the problem.
Instead, the new paint can effectively become another layer attached to a weak foundation.
The new coating might look perfect when first applied.
Then, as it dries and the wall experiences normal movement and changes in temperature and humidity, the weak layer underneath can begin to fail.
The result?
More peeling.
More cracking.
More flakes.
And another decorating job.
Preparation Is Often the Real Fix
One of the biggest lessons from Paint Flaking is that paint preparation matters.
It can be tempting to think that decorating is mainly about choosing the right colour and applying the paint neatly.
But a durable finish starts long before the roller touches the wall.
Loose material needs to be removed.
Flaking paint needs to be dealt with.
Dust and contamination need to be considered.
The underlying surface needs to be sound.
Where necessary, repairs need to be allowed to dry properly before decorating continues.
This can be frustrating because preparation isn’t particularly glamorous.
Nobody gets excited about spending hours scraping old paint from a wall.
But preparation is often the difference between a finish that lasts and one that starts failing again a few months later.
Don’t Just Paint Over Flaking Paint
This is one of the most common mistakes when dealing with Paint Flaking.
You notice a small area of peeling paint.
You scrape away the obvious loose bits.
You apply a fresh coat.
It looks great.
For a while.
Then the surrounding paint starts lifting.
Why?
Because the underlying problem wasn’t necessarily the visible flake.
There may still be poorly bonded material around it.
The new paint can only adhere as well as the surface underneath allows.
If the substrate is weak, chalky or contaminated, the new coating is being asked to perform on an unsuitable surface.
That’s why preparation needs to go beyond simply making the wall look tidy.
The objective is to create a sound surface for the new coating.
What Is a Specialised Primer?
A specialised primer can be useful when dealing with difficult or problematic surfaces.
Primers are designed to perform specific functions.
Some help improve adhesion.
Some seal porous surfaces.
Some stabilise chalky substrates.
Others are designed to bridge between different types of coating or prepare surfaces that would otherwise be difficult to paint successfully.
This is particularly useful where the wall has been stripped, repaired or contains a mixture of old and new surfaces.
However, primer isn’t magic.
It shouldn’t be used to glue down paint that is already loose.
If the old coating is failing, the weak material needs to be dealt with first.
A primer should be applied to a suitably prepared surface.
Stabilising a Problem Surface
Where old paint or the underlying surface is friable, a stabilising primer can sometimes help consolidate the surface before decoration.
The idea is to strengthen or bind a surface that might otherwise interfere with adhesion.
This can be particularly useful on older walls where the surface has become dusty or powdery.
But the exact product needs to match the problem.
A primer designed for one type of surface isn’t automatically appropriate for another.
Always follow the manufacturer’s instructions and check whether the product is suitable for the existing coating and substrate.
Don’t Ignore the Wall Behind the Paint
It is also important to look beyond the paint itself.
Paint is only the visible finish.
Behind it could be plaster, render, masonry, plasterboard or another substrate.
If the underlying material is cracked, friable or damaged, painting won’t solve the problem.
For example, if plaster is becoming detached from the wall, simply applying primer and paint could temporarily hide the symptoms without fixing the underlying issue.
The same applies to cracks.
A hairline crack may be relatively insignificant, but a larger or recurring crack could indicate movement that needs further investigation.
The decoration should never be treated as the entire wall system.
Check for Moisture Before Decorating
Even when Paint Flaking appears to be an adhesion problem, it is sensible to rule out obvious moisture sources before carrying out a repair.
Look at the external wall.
Check gutters and downpipes.
Look for damaged pointing.
Inspect areas around windows and doors.
Consider whether there are plumbing services nearby.
Look for staining or salt deposits.
Check whether the problem is concentrated around one particular location.
The aim isn’t to become obsessed with damp.
It’s simply to avoid making an assumption in either direction.
If there is genuine moisture entering the wall, painting over it won’t solve the problem.
But if the wall is dry and the actual issue is failed paint adhesion, unnecessary damp treatments can be equally unhelpful.
For homeowners carrying out decorating or renovation work, the Planning Portal’s guidance on decorations and Building Regulations can also be useful where painting forms part of a wider building project.
Why the Wrong Repair Can Make Things Worse
One of the dangers of misdiagnosing Paint Flaking is using an inappropriate treatment.
If someone assumes every peeling wall is suffering from damp, they may start looking at waterproof coatings or other damp-related solutions.
But if the wall isn’t suffering from penetrating moisture, that may not address the actual problem.
Similarly, if someone assumes every peeling wall simply needs another coat of paint, they may trap the same problem underneath a fresh finish.
The right repair starts with the right diagnosis.
A Better DIY Approach
For a DIY homeowner, the process can be broken down into a few sensible stages.
First, identify the extent of the problem.
Don’t just look at the obvious peeling patch.
Check the surrounding paint.
Gently test whether nearby areas are firmly bonded.
Then investigate the wall itself.
Look for signs of moisture, staining, mould, salts or damage.
Next, remove loose and poorly bonded material.
The aim is to get back to a sound surface rather than simply creating a neat-looking edge around the damaged area.
Once the surface has been prepared, remove dust and contamination as appropriate.
Allow repairs and cleaning to dry properly.
Then choose a primer or stabilising product suitable for the actual substrate and existing coating.
Only after the surface has been properly prepared should the finishing paint be applied.
The Real Problem May Be Adhesion
Ultimately, that is the key lesson from Roger’s viewer query.
Paint Flaking doesn’t automatically mean damp.
Sometimes the real problem is adhesion.
The coating may be poorly bonded.
The surface underneath may be dusty or friable.
Previous layers may have failed.
The substrate may be porous or contaminated.
Or the wrong preparation may have been carried out before the last decorating job.
Once you understand that, the repair becomes much more logical.
Instead of repeatedly painting over the symptom, you investigate the surface, remove what has failed, prepare what remains and use an appropriate primer before applying the final coating.
And that is often the difference between painting over a problem and actually fixing it.
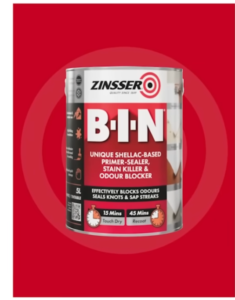
Zinsser B-I-N Shellac Primer 👇
https://go.skill-builder.uk/zinsser
@ZinsserUK
_______________________
#diy #homeimprovement #damp #decorating